ラズパイとラズパイをWi-Fiダイレクト接続するという機会があったので、手順をメモっておきます。下記の手順は片方のラズパイに設定することで、もう片方のラズパイからはWi-Fi接続先をGUIから設定するのみ(無線LANルータに接続する手順と同様)で接続可能です。
hostapd
hostapdは、ラズパイをアクセスポイントにするソフトウェアそのものです。インストールが完了したら、SSID,パスワード,セキュリティなど数項目の設定が必要です。
hostapdのインストール
$ sudo apt-get update
$ sudo apt-get upgrade
$ sudo apt-get install -y hostapd
hostapdを明示的に停止します。
$ sudo systemctl stop hostapd
インターフェース設定
IPアドレスを設定します。ここでは192.168.80.1としていますが、環境によって書き換えてください。ラズパイ自身がアクセスポイントになるので、最後は必ず1にしましょう。
$ sudo nano /etc/dhcpcd.conf
denyinterfaces wlan0
interface wlan0
static ip_address=192.168.80.1/24
IPアドレスを固定します。/etc/network/interfacesを開き、wlan0の設定を下記の通り変更します。
allow-hotplug wlan0
iface wlan0 inet static
address 192.168.80.1
netmask 255.255.255.0
hostapdの設定
hostapd.confは、環境によって存在しない場合があります。存在すれば新規作成すればよいですが、ない場合は新規作成します。SSID,passphrase(パスワード)は任意です。接続が不安定な場合、channelを変えてみてください。
$ sudo nano /etc/hostapd/hostapd.conf
interface=wlan0
driver=nl80211
ssid=RASPI_SSID
hw_mode=g
channel=6
wmm_enabled=0
macaddr_acl=0
auth_algs=1
wpa=2
wpa_key_mgmt=WPA-PSK
rsn_pairwise=CCMP
wpa_passphrase=YOUR_PASSWORD
起動時にこの設定を読み込んでくれるように設定します。
$ sudo nano /etc/default/hostapd
# Defaults for hostapd initscript
#
# WARNING: The DAEMON_CONF setting has been deprecated and will be removed
#          in future package releases.
#
# See /usr/share/doc/hostapd/README.Debian for information about alternative
# methods of managing hostapd.
#
# Uncomment and set DAEMON_CONF to the absolute path of a hostapd configuration
# file and hostapd will be started during system boot. An example configuration
# file can be found at /usr/share/doc/hostapd/examples/hostapd.conf.gz
#
#DAEMON_CONF=""

# Additional daemon options to be appended to hostapd command:-
#       -d   show more debug messages (-dd for even more)
#       -K   include key data in debug messages
#       -t   include timestamps in some debug messages
#
# Note that -B (daemon mode) and -P (pidfile) options are automatically
# configured by the init.d script and must not be added to DAEMON_OPTS.
#
#DAEMON_OPTS=""
中ほどにある#DAEMON_CONF=””のコメントアウト(#)を外し、先ほど作成した設定ファイル(hostapd.conf)のパスを追加します。
DAEMON_CONF="/etc/hostapd/hostapd.conf"
自動起動設定
/etc/rc.localにhostapdの起動コマンドを追記し、電源ON時に自動起動するようにします。
fiとexit0の間に追記します。
$ sudo nano /etc/rc.local
#!/bin/sh -e
#
# rc.local
#
# This script is executed at the end of each multiuser runlevel.
# Make sure that the script will "exit 0" on success or any other
# value on error.
#
# In order to enable or disable this script just change the execution
# bits.
#
# By default this script does nothing.

# Print the IP address
_IP=$(hostname -I) || true
if [ "$_IP" ]; then
  printf "My IP address is %s\n" "$_IP"
fi

/etc/init.d/hostapd start

exit 0
dnsmasq
dnsmasqは小規模ネットワーク向けのDNS/DHCP/TFTPサーバーです。
dnsmasqのインストール
$ sudo apt-get install dnsmasq
dnsmasqを明示的に停止します。
$ sudo systemctl stop dnsmasq
dnsmasqの設定
接続してくる端末に配布するIPアドレスの範囲を設定します。アクセスポイント自身が192.168.80.1なので、2以上が設定できます。ここでは2~40としています。(192.168.80.2~192.168.80.40)
$ sudo nano /etc/dnsmasq.conf
interface=wlan0
dhcp-range=192.168.80.2,192.168.80.40,255.255.255.0,24h
hostpad,dnsmasqの起動
アプリを起動します。
$ sudo systemctl start hostapd
$ sudo systemctl start dnsmasq
マスクがうんぬんというエラーが出た場合は、サービスのマスクを外すコマンドを実行してから再度起動します。
$ sudo systemctl unmask hostapd
$ sudo systemctl enable hostapd
$ sudo systemctl start hostapd
完了!
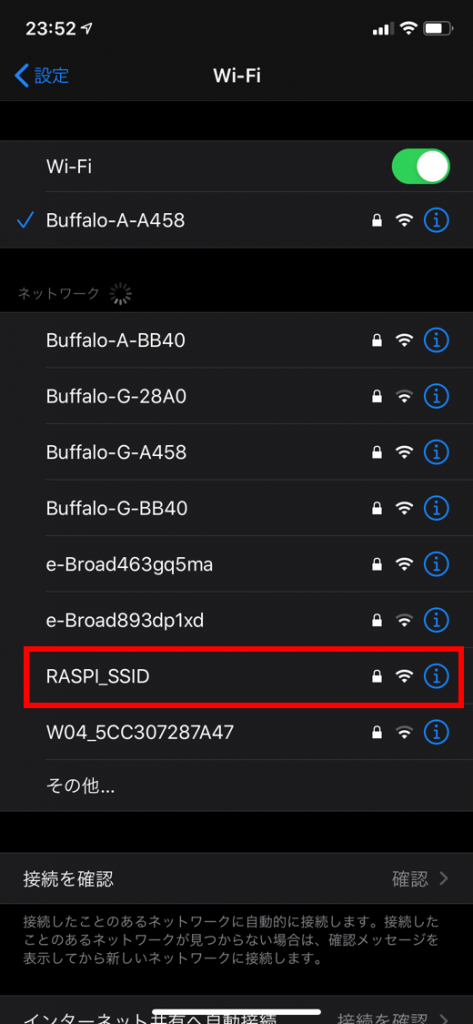
手順は以上です。ラズパイを再起動して、設定したSSIDがスマートフォンなどから見えれば成功です。
↓自分のスマホで見てみると、先ほど設定した「RASPI_SSID」が表示されています。あとはファイルサーバを立てるなり、ストリーミングを行うなり、好きに使ってしまいましょう。


